End of My Rope
End of My Rope

Hello! I am excited to share this pattern with you....
One of the things I love the most about crocheting is how tactile it is; texture I can run my fingers over, buttons I can fiddle with, loops I can poke my fingers into, and fringe that I can play with. Can we just take a moment to say hooray for textiles!
One of the things I love the most about crocheting is how tactile it is; texture I can run my fingers over, buttons I can fiddle with, loops I can poke my fingers into, and fringe that I can play with. Can we just take a moment to say hooray for textiles!
As a crochet designer, I love taking these tactile elements and putting them together in new or unusual ways. This square accomplishes that for me. I have wanted to create a project with 'internal' fringe for a while - something that incorporates this tactile element into the actual block, rather than relegating it to the outside edge. This block plays on a nautical theme, with a center motif that features frayed fringe - designed to look like a frayed rope. This square truly takes the simplest of crochet stitches and attempts to put them together in a new and different way. It is written to be made multi-color or solid, and even though I personally love the look of the fringe, it can also be made without it. Enjoy!
Before you begin:
This pattern was written and designed by me, Lisa Mauser, for This Little Hook of Mine. I am happy to share it with you, but this pattern belongs to me and I retain all rights. You may not distribute, sell, or share this pattern, or any parts of it. If you wish to share the pattern, please refer the party you are sharing it with to the original pattern link.
Though this pattern has been tested, it is not perfect. If you find a mistake, please let me know in the comments below or through the contact me button and I will fix it.
Thank you for respecting my property. I really hope you enjoy the pattern. I you prefer a printable PDF, you may download one for a small fee through my Ravelry account by clicking here.
Materials and Project Basics:
·
Size H/5 mm crochet hook;
·
Tapestry needle for weaving in ends;
·
Worsted weight yarns in the brand/color of
your choosing. I used the following
colors:
Color A – Denim – Hobby Lobby I Love
This Yarn!
Color B – Linen – Hobby Lobby I Love
This Yarn!
Color C – Silver Blue – Vanna’s Choice
Color D – Grey -Vanna’s Choice
Size and
Gauge:
·
Using an H size/5 mm hook I obtained a 12”
square
Basic
Terms/Abbreviations Used (US):
ch – chain dc
– double crochet
yo – yarn over trc
– triple crochet
slst – slip stitch FLO – front loop only
sc – single crochet BLO – back
loop only
hdc – half double crochet BPdc – back post
double crochet
For ease of reference, special
stitches, are defined in the rounds they are used in.
Beginning
Loop:
With color A, ch 5. Join
with slst to beginning ch – beginning loop made. DO NOT fasten off.
Round 1:
Ch 2 - counts as 1st
hdc. (2 hdc) in beginning loop. (Ch 2, 3 hdc in beginning loop) 3 times. Ch 2 and join with slst to beginning ch-2. DO NOT fasten off.
----------
----------
Round 2:
Ch 2 - counts as 1st
hdc. Hdc in next 2 stitches. *(2 hdc, ch 1, 2 hdc) in next corner
space. Hdc in the next 3 stitches*. Repeat * to * 3 times. (2 hdc, ch 1, 2 hdc) in last corner
space. Join with slst to beginning ch-2.
If you are changing colors, fasten off.
7
stitches per side.
----------
----------
Round 3:
If working in same color, slst into the next corner
space. Ch 1, sc in same space - this is your beginning sc.
If changing color, join
color with B a standing sc in any corner space.
(Ch 1, sc) in the same corner.
*Slst in FLO of next 7
stitches. (Sc, ch 1, sc) in the next
corner space*. Repeat * to * 3 more
times, eliminating corner sequence on final repeat. Join with a slst to beginning sc. If
you are changing colors, fasten off. 7 slst
and 2 scs per side for a total of 9 stitches.
----------

Round 6:


Round 15:

*Dc in 1st hidden stitch.
Work the Cross Cable pattern as follows: [Skip one stitch, dc in the
next 3. Enclosing the group of 3 dcs
just made, yo and insert your hook into the skipped stitch. Pull up a loop so it is even with the other dcs. Yo and pull through two loops, yo pull
through two loops] 8 times. Dc in the last stitch before the corner. (Dc, ch 1, dc) in the next corner space*. Repeat * to * 3 times, eliminating corner
sequence on final repeat.


----------
A QUICK NOTE ABOUT
YOUR FRONT AND BACK LOOPS AT THIS POINT:
After Round 3 (and
subsequent slst rounds) you will have two rows of loops behind your work (see
photo). The front loops (which contain
your slsts) and the back loops, which are completely unworked. In
order to achieve a clean line, we will be working in the FLOs that already
contain your slip stitches, not the unworked BLOs. Make sure you are working in the correct
loops.

Round 4:
If working in same color, slst into the next corner
space and ch 4 - counts as 1st
hdc and ch-2.
If changing color, join
color C with a standing hdc in any corner space. Ch 2.
Hdc in same corner space.
*Hdc in 1st stitch of side.
You should have 7 FLOs that
contain slsts per side. Refer to photos and explanation above. Hdc in each of these loops. Hdc in the last stitch before the
corner. Hdc, ch 2, hdc in the next
corner space*. Repeat * to * 3 times, eliminating corner sequence on final
repeat.
If you are working in the same color, join with a slst
to 2nd ch of beginning ch-4.
You should have 11 stitches per side.
If you are changing color,
join with a slst to beginning hdc and fasten off. You should have 11 stitches per side.
----------
Round 5:
Note: In this round we will begin making the chain
loops that will be woven together after Round 10. In this and subsequent chain rounds, don’t
make the chains too tight. By the same token, don’t make them too loose and
sloppy - they will show on the front of your work. Nice even chains please!
If working in same color, slst into the next corner
space. Ch 1, sc in same space - this is your beginning sc.
If changing color, join
color B with a standing sc in any corner space.
Ch 1, sc in same corner space. *Slst in the FLO of the first 2 stitches, ch
7, slst in the FLO of the next 7 stitches.
Ch 7, slst in the FLO of the last 2 before the corner. (Sc, ch 1, sc) in the next corner space*.
Repeat * to * 3 more times, eliminating the corner sequence on the final
repeat. Join with a slst to your
beginning sc. If you are changing
colors, fasten off.
----------
Note: You will be working behind your chain loops
in this round – keep them pushed forward and in front of your work. When you come to an FLO that contains a
chain, work in the FLO to the right of the chain (see photo).

If working in same color, slst into the next corner
space and ch 4 - counts as 1st
hdc and ch-2.
If changing color, join
color D with a standing hdc in any corner space. Ch 2.
Hdc in same corner space.
*Hdc in 1st stitch of side.
You should have 11 FLOs that
contain slsts per side - hdc in each
of these loops. Hdc in the last stitch
before the corner. (Hdc, ch 2, hdc) in
the next corner space*. Repeat * to * 3 times, eliminating corner sequence on
final repeat.
If you are working in the same color, join with a slst
to the 2nd ch of beginning ch-4.
You should have 15 stitches per side.
If you are changing color,
join with a slst to beginning hdc and fasten off. You should have 15 stitches
per side.
----------
Round 7:
If working in same color, slst into the next corner
space. Ch 1, sc in same space - this is your beginning sc.
If changing color, join
color B with a standing sc in any corner space.
Ch 1, sc in same corner space. *Slst in the FLO of the first
7 stitches. Ch 8, Skip the next stitch, slst
in the FLO of the last 7 before the corner.
(Sc, ch 1, sc) in next corner space*.
Repeat * to * 3 more times, eliminating the corner sequence on the final
repeat. Join with a slst to your
beginning sc. If you are changing
colors, fasten off.
----------
Round 8:
Note: You will be working behind your chain loops
in this round – keep them pushed forward and in front of your work. When you come to an FLO that contains a
chain, work in the FLO to the right of the chain - see photo in Round 6.
If working in same color, slst into the next corner
space and ch 4 - counts as 1st
hdc and ch-2.
If changing color, join
color C with a standing hdc in any corner space. Ch 2.
Hdc in same corner space.
*Hdc in 1st stitch of side.
Hdc in the 1st 7 FLOs that contain slsts. Hdc in the BLO of the next skipped stitch. Hdc in the next 7 FLOs that contain slsts. Hdc
in the last stitch before the corner. (Hdc,
ch 2, hdc) in the next corner space*. Repeat * to * 3 times, eliminating corner
sequence on final repeat.
If you are working in the same color, join with a slst
to 2nd ch of beginning ch-4.
You should have 19 stitches per side.
If you are changing color,
join with a slst to beginning hdc and fasten off. You should have 19 stitches
per side.
----------
Round 9:
If working in same color, slst into the next corner
space. Ch 1, sc in same space - this is your beginning sc.
If changing color, join
color B with a standing sc in any corner space.
Ch 1, sc in the same corner space. *Slst in the FLO of the first 7 stitches, ch
7, slst in the FLO of the next 5 stitches.
Ch 7, slst in the FLO of the last 7 before the corner. (Sc, ch 1, sc) in the next corner space*. Repeat * to * 3 more times, eliminating the
corner sequence on the final repeat.
Join with a slst to your beginning sc.
If you are changing colors, fasten off.
----------
Round 10:
Note: You will be working behind your chain loops
in this round – keep them pushed forward and in front of your work. When you come to an FLO that contains a
chain, work in the FLO to the right of the chain (see photo in Round 6).
If working in same color, slst into the next corner
space and ch 4 - counts as 1st
hdc and ch-2.
If changing color, join
color D with a standing hdc in any corner space. Ch 2.
Hdc in same corner space.
*Hdc in 1st stitch of side.
You should have 19 FLOs that contain slsts - hdc in each of these loops. Hdc in the last stitch before the
corner. (Hdc, ch 2, hdc) in the next
corner space*. Repeat * to * 3 times, eliminating corner sequence on final
repeat.
If you are working in the same color, join with a slst
to 2nd ch of beginning ch-4.
You should have 23 stitches per side.
If you are changing color,
join with a slst to beginning hdc and fasten off. You should have 23 stitches
per side.
----------
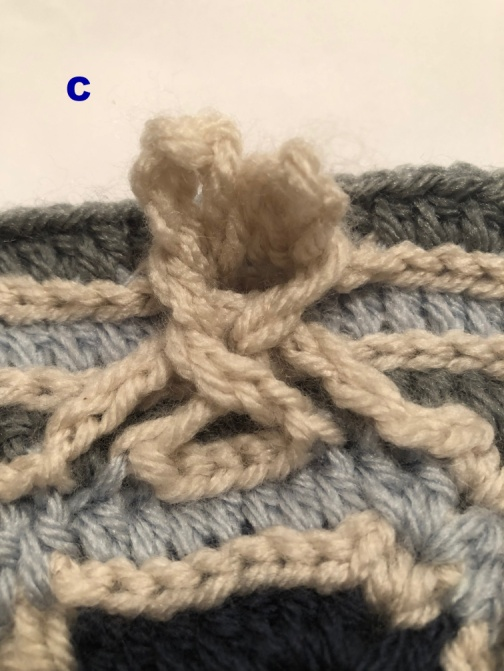
Before beginning this next round, familiarize yourself with these ‘HOW TO WEAVE YOUR LOOPS’ instructions:
HOW TO WEAVE YOUR
LOOPS:

You will need to weave your loops together to form a braided
‘rope’ motif. You can either weave them
together after Round 10, or as-you-go in Round 11. Weave them together as follows:
A. Place
your bottom left loop over the top of your center loop;
B. Place
your bottom right loop over the top of your center loop;
C. Pull
your top left and top right loops through your center loop;
D. Pull
your top right loop through your top left loop.
You will be left with two remaining smaller loops. In round 11, we will work through these
‘remaining’ loops to secure our rope motifs.


Round 11:
If working in same color, slst into the next corner
space. Ch 1, sc in same space -this is your beginning SC.
If changing color, join
color B with a standing sc in any corner space.
Ch 1, sc in same corner space. *Skip the first ‘hidden’ stitch and sc in the
next 9. Weave your loops according to
instructions. Sc through the first
remaining loop and next stitch – stitch
through these together. Sc in the
next 2 stitches. Sc through the second
remaining loop and next stitch – stitch
through these together. Sc in the
last 9 stitches of the side. (Sc, ch 1, sc)
in the next corner space*. Repeat from
* to * 3 times, eliminating corner sequence on final repeat. Join with a slst
to your beginning sc. If you are
changing colors fasten off. 24 stitches
per side.
----------
Round 12:
If working in the same color, slst into the next
corner space. Ch 3 - counts as 1st dc.
If you are changing colors,
join color A with a standing dc in any corner space.
(Dc, ch 1, 2 dc) in same space. *BPdc in the next 10 stitches. Hdc in the BLO of the next 4. BPdc in
the last 10 stitches before the corner. (2 dc, ch 1, 2 dc) in next corner
space*. Repeat * to * 3 more times, eliminating the corner sequence on final
repeat.
If you are working in the same color, join with a slst
to top of beginning ch-3. You should
have 28 stitches per side.
If you are changing colors,
join with a slst to beginning dc and fasten off. You should have 28 stitches per side.
----------
Round 13:
If working in the same color, slst into the next dc. Slst into the next corner space. Ch 1, sc in same space - this is your beginning SC.
If you are changing colors,
join color C with a standing sc in any corner space.
Ch 1, sc in same corner space. *Skip the first ‘hidden’ stitch, sc in the
next 27 stitches. (Sc, ch 1, sc) in the
next corner space*. Repeat * to * 3 more
times, eliminating the corner sequence on the final repeat. Join with a slst to beginning sc. If you are changing colors, fasten off. You should have 29 stitches per side. Count
is important here for the pattern in the next round.
----------
Round 14:
Special Stitch – puff stitch: In this round you will be making ‘puff’
stitches. Do this by inserting your hook
into the indicated stitch. Pull up a
loop – 2 LOOPS ON HOOK. YO and insert
hook into same stitch. Pull up a loop –
4 LOOPS ON HOOK. YO and insert hook into
same stitch. Pull up a loop – 6 LOOPS ON
HOOK. YO and pull through all 6
loops. Close stitch with a chain. This will be the top of your puff stitch in
future rounds. For pattern purposes, this
final ch-1 does not count as the ch-1 space between puffs.
If you are working in the same color, slst into the
next corner space. Ch 1, puff in the
same corner space.
If you are changing colors,
join color B with a puff in any corner space.
Ch 1, puff in the same corner space. Ch 1 and Skip the first ‘hidden’ stitch. [Puff
in the next stitch, ch 1, skip the next stitch] 14 times. (Puff, ch 1, Puff) in the next corner space*. Repeat * to * 3 times, eliminating the corner
sequence on final repeat. Join with a slst
to beginning puff. If you are changing
colors, fasten off. Note – even on my color changing square, I worked the next round in the
same color.
----------
In this round you will be working into the top of your puff stitches. It is important to understand what is meant by the 'top of your puff.' This photo is shared to help you identify which stitch you should be crocheting into in the following round:

If working in the same color, slst into the next
corner space. Ch 1, sc in the same
corner space - this is your beginning sc.
If changing color, join
color of your choice with a standing sc in any corner space - This is your beginning sc. Note
- I did not change colors for this round.
Ch 1, sc in same corner space. *[Sc in top of next puff, sc in the next ch-1
space] 8 times. Sc in the same ch-1
space as your last stitch - increase made. [Sc in the top of the next puff, sc in the
next ch-1 space] 7 times. Sc in the last
puff before the corner space. (Sc, ch 1,
sc) in next corner space*. Repeat * to *
3 times, eliminating the corner sequence on the final repeat. Join with a slst to beginning sc. If you are changing colors, fasten off. Note –
even on my color changing square, I worked the next round in the same color.
You should have 34 per side. Make sure you have the right
count and worked your increases as it is important for the pattern in the next
round.
----------
Round 16:
If working in the same color, slst into the next
corner space. Ch 4 - counts as 1st dc and ch-1 space. Dc in same corner space.
If you are changing color,
join color of your choice - note I did
not change colors for this round - with a standing dc in any corner
space. Ch 1, dc in same space.
If working in the same color, join with a slst to 3rd
ch of beginning ch-4.
If changing colors,
join with a slst to the beginning dc and fasten off.
----------
Round 17:
If working in the same color, slst into the next
corner space. Ch 1, sc in the same
corner space - this is your beginning sc.
If changing color, join
color C with a standing sc in any corner space.
This is your beginning sc.
(Sc, ch 1, 2 sc) in same space. *Skip the first ‘hidden’ stitch and sc in next
35. (2 sc, ch 1, 2 sc) in next corner space*.
Repeat * to * 3 times, eliminating corner sequence on final repeat. Join with a slst to beginning sc. If you are changing colors, fasten off. You should have 39 stitches per side.
----------
Round 18:
Note: Because everyone’s tension is different, you
may want to measure your square before you begin this round. If you think this round may put you over,
work it in scs instead of hdcs, or skip it all together. Also – if you have been working with one color
and would like to add a little more texture at the edge, try working this in BPhdcs. Work your corners the same and just back post
around the stitches instead of working into them!
If working in the same color, slst into the next sc. Slst into the next corner space. Ch 4 - counts
as 1st hdc and CH-2 space.
Hdc in same space.
If changing color, join
color A with a standing hdc in any corner space. Ch 2, hdc in same space.
*Hdc in the first ‘hidden’ stitch and in the next 38 stitches. (Hdc, ch 2, hdc) in the next corner space*. Repeat * to * 3 more times, eliminating
corner sequence on final repeat.
If you have been working with the same color, join
with a slst to second chain of beginning ch-2 and fasten off at last!
If you changed colors,
join with a slst to beginning hdc and fasten off. You are done!
You should have 41 stitches per side.
----------
OPTIONAL FRAYED ENDS:
After Round 12, at the end of each ‘rope’ motif, we left 4
unworked FLOs. Using a 3” piece of yarn
in the same color as your ‘rope’ motif, add a ‘fringe’ in each of these FLOs
(see photos and step-by-steps). Trim
your ends down to 1 ½” or so, and fray the yarn to secure in place and create
an unraveled texture.
·
Cut 3” pieces of yarn in the same color as your rope motif;
·
Fold in half.
Pull through FLO from top to bottom (see photo);
·
Tuck your ends through the ‘loop’ formed by the
fold (see photo);
·
Pull until tight, being careful to pull nice and
firm without stretching your front loops out of shape.
·
Trim to about 1 ½“ and fray. Note –
it is easiest to fray from the base of the strand up.

YOU ARE DONE! Weave in your ends and enjoy!!


Comments
Post a Comment