Tintagel
Tintagel is the first of four 6" squares designed as a part of the Legends of King Arthur series. Each of these squares will be named after a place associated with the Legends and will represent the phases of Arthur's journey: birth, life, death, and eternity.
Named after Tintagel Castle, a real historic castle in North Cornwall, this square represents Arthur's birth. According to 12th-century writer Geoffrey of Monmouth's book,
History of British Kings, Arthur's mother, Igraine, stayed at the castle during the time she conceived Arthur and the castle is believed by many historians to be the birthplace of the real King Arthur. There's even some intriguing archeological evidence to back this up - check out the
Artognou Stone. Either way, the castle has been prominently attached to the legends for centuries.
This pattern, like the Legends themselves, is not for the faint of heart. It features INTERMEDIATE TO ADVANCED construction techniques.
Special thanks to the following Ravelry members for testing this square:
MawMawsGarden, Wuzzel, danika2407, ranthenae, and hrdnglynne
I appreciate the time and effort you put into testing this square and, in many cases, the entire series!
As always, I hope you enjoy the pattern!
- Lisa
Materials:
·
Size H/5 mm crochet hook;
·
Tapestry needle for weaving in ends;
·
8 stitch markers;
· Worsted weight yarns in the brand/color of your choice - if making the full Legends of King Arthur Blanket, make 3 squares. I used the following colors - note Land version expressed as letters and Celtic colorway expressed as numbers:
|
|
Tintagel
by Land A
|
Tintagel
by Land B
|
Tintagel
by Land C
|
|
A
|
Red
|
Aubergine
|
Mixed Berry
|
|
B
|
Graphite
|
Greybeard
|
Graphite
|
|
C
|
Sungold
|
Burnt Pumpkin
|
Mid Green
|
|
D
|
Burnt Pumpkin
|
Red
|
Sungold
|
|
E
|
Greybeard
|
Graphite
|
Greybeard
|
|
F
|
Purple
|
Mid Green
|
Red
|
|
G
|
Mid Green
|
Sungold
|
Burnt Pumpkin
|
|
|
Celtic
Colorway A
|
Celtic
Colorway B
|
Celtic
Colorway C
|
|
1
|
Navy
|
Antique Teal
|
Forest
|
|
2
|
Light
Sage
|
Light
Sage
|
Light
Sage
|
|
3
|
Sea
Blue
|
Sea
Blue
|
Sea
Blue
|
|
4
|
Antique Teal
|
Forest
|
Navy
|
|
5
|
Greybeard
|
Greybeard
|
Greybeard
|
|
6
|
Forest
|
Navy
|
Antique Teal
|
Note about selecting colors: For the Celtic Colorway colors 2, 3, and 5
remain the same in all 3 squares. This
creates a nice unity and can be helpful in planning.
Hook Size/Gauge:
Using an H size hook I was
able to obtain a 6” square.
Basic Terms/Abbreviations Used (US):
ch – chain FPsc
– front post single crochet
yo – yarn over BPsc
– back post single crochet
slst – slip stitch FPdc
– front post double crochet
sc – single crochet
hdc – half double crochet
dc – double crochet
tr – triple crochet
For reference ease, special
stitches are defined in the rounds they are used in. In-round notes are blue.
Beginning Loop:
With color A/1, ch-4. Join with a slst to beginning ch – beginning loop made.
Round 1:
Ch 3 – counts as
beginning dc. Dc in beginning loop, [ch 3, 2 dc in beginning loop] 3
times. Ch 3, join with a slst to 3rd ch of
beginning ch-3. DO NOT fasten off. 8 dc and 4 ch-3 spaces.
Round 2:
Special Stitch –
Extended mini puff - xmp – insert hook into indicated stitch or space,
pull up a loop – 2 LOOPS ON HOOK. Yo,
insert hook into same indicated stitch or space, pull up a loop – 4 LOOPS ON
HOOK. Yo, pull through 3 loops, yo pull
through last 2 loops.
Ch 2 – counts as
beginning hdc. *Xmp in between the stitch just worked
in and the next stitch, hdc in the next stitch, ch 4, skip the ch-3 space, hdc
in the next stitch.* Repeat * to * 3 more times omitting last hdc on final
repeat. Join with a slst to 2nd ch of beginning ch-2, fasten off, or
alternatively, join with an invisible join as we will be back posting around
the beginning stitch in the next round.
8 hdc, 4 xmp and 4 ch-4 spaces.
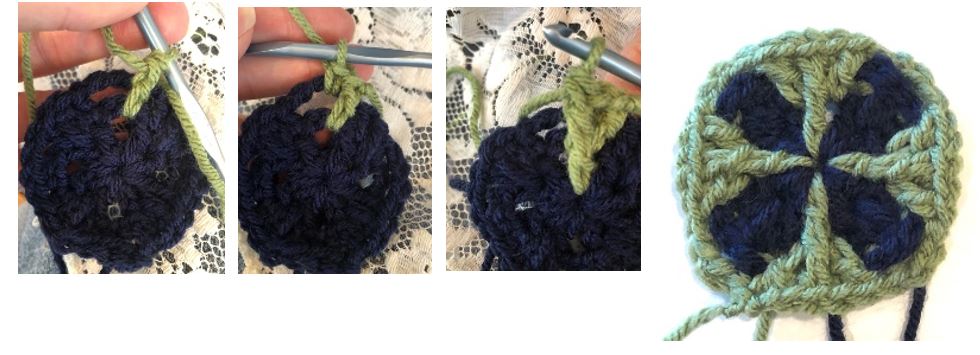
Round 3:
In
the prior rounds, we built a ‘ladder’ of ch-spaces along our sides. We will be working into these spaces and into
the beginning loop between the sets of dcs already there in this round. Take a moment to familiarize yourself with
these chain spaces and round numbers before beginning. See photo below left – Round
numbers are shown to right of corresponding ch-space. Stitch marker shows where you will work into
the ‘beginning loop’.
Special Instruction – Shallow Post Stitches - For a more
even look and for easier access, work your back post stitches ‘shallow’ in
this and subsequent rounds. To do
this, make the back post stitch at the very top of your stitches, just under
the front and back loops and above the 3rd loop rather than dropping beneath
the 3rd loop and working around the post itself (see photo above right – hook entering
stitch from back to front above the 3rd loop and arrow is showing where hook
will exit from front to back above 3rd loop to complete the stitch – photo from
different pattern).
Working
in any ch-3 space from Round 1, in front of, not over, your other round chain – join color B/2 with a standing dc in the Round 1 ch-3
space, *sc in the ch-4 space from Round 2, tr in the beginning loop
between sets of dcs, sc in the ch-4 space from Round 2 again, dc in the
ch-space from Round 1 again.
Returning to Round 2, BPsc around the next stitch, ch 2, skip the
next xmp, BPsc around the
next stitch. Working in the next ch-3 space from Round 1, in
front of, not over your other round chain – dc in the next Round 1 ch-3 space.* Repeat * to * 3 more times, omitting last dc
on final repeat. Join with a slst to
beginning dc and fasten off. 8 BPsc,
8 sc, 8 dc, 4 tr, and 4 ch-2 spaces.
Don’t forget to shallow
post your stitches.
Special
stitch – Popcorn – pop - Work 5 dc in indicated stitch. Drop the loop from your hook and insert hook
from front to back in the first stitch of group. Pick up the dropped loop and pull through
stitch. Close with a ch 1. Closing chain
does not count as a stitch for pattern purposes.
Join color
C/3 with a standing popcorn in any ch-2 space.
*Ch 2, skip the next stitch, BPsc around the next stitch, [ch 1, skip
the next stitch, BPsc around the next stitch] twice – mark the two stitches just skipped – we will work into
them in Round 7.
Ch 2, skip the next stitch, pop in the next ch-2 space.* Repeat * to * 3 more times, omitting last pop
on final repeat. Join with a slst to
beginning pop and fasten off. 4 pop,
12 BPsc, 8 ch-1 spaces, and 8 ch-2 spaces.
In this round we will be
working around the popcorns from Round 4 and in our Round 3 stitches. We will be skipping all other stitches from
Round 4 other than the popcorns. Be sure
to work in front of, not over, your skipped stitches.
Join color
D/4 with a standing FPdc around any popcorn.
(Ch 2, FPdc) around same popcorn – corner
made. *Dropping
to Round 3, working in front of your Round 4 stitches and skipping all
additional Round 4 stitches and chains – tr in the next stitch – this will
likely be hidden by your popcorn. FPdc around
the next stitch – working in front of the
BPsc already there. [Ch 1, skip the next ‘marked’ stitch, FPdc around the
next stitch] twice. Tr
in the last Round 3 stitch before the next popcorn. Returning to Round 4 – (FPdc, ch
2, FPdc) around the next popcorn – corner made.* Repeat * to * 3 more times, omitting corner
sequence on final repeat. Join with a
slst to beginning dc and fasten off. 7 stitches and 2 ch-1 spaces per side.
Round 6:
Special
stitch – Front Post Triple 2 Together – FPtr 2tog - Yo twice. Insert hook from front to back to
front around the post of the first indicated stitch and draw up a loop. [Yo ,
pull through 2 loops] twice – 2 LOOPS ON HOOK.
Yo twice. Insert hook from front to back to front around the post of the
last indicated stitch and draw up a loop. [Yo , pull through 2 loops] twice – 3
LOOPS ON HOOK. Yo and draw through all 3
loops.
Special Stitch – Chain 3 Picot (ch 3 picot)
– ch 3 and slst into the front
loop and left vertical bar of the last stitch made (photos below left: yellow
highlights front loop and left vertical bar; photo right: hook inserted into
front loop and vertical bar – photos from different pattern).
Special
note for this pattern – when working a picot in FPtr 2tog – work through all 3 vertical bars
(last photo above: yellow highlights 3 bars you will work through).
In the prior round,
we worked FPdcs around our popcorns to form corners and along our sides
– we will be skipping all the FPdcs that we made to form corners and working
only around those made on the sides – join color E/5 with a standing FPsc around the first FPdc of any side.
*(Hdc, dc) in the next sp, FPdc around the next stitch, ch 3 picot in FPdc just
made, (dc, hdc) in the next sp, FPsc around the next stitch. You should have a triple on each side of the popcorn,
skipping the corner FPdcs and ch-2 space - Ch 3, FPtr 2tog
around the triple to the right of the popcorn and around the triple to the left
of the popcorn. Ch 3 picot in the FPtr
2tog just made – work through all three bars at the top – see photo above. Ch 3, FPsc around the first FPdc of
the next side.* Repeat * to * 3 more times, omitting last FPsc on final
repeat. Join with a slst to beginning
FPsc and fasten off, or alternatively use an invisible join
for a cleaner look as these stitches will
stay on the surface of your work. 8 dcs, 8 hdcs, 4 FPdcs, 8 FPscs, 4 FPtr 2tog,
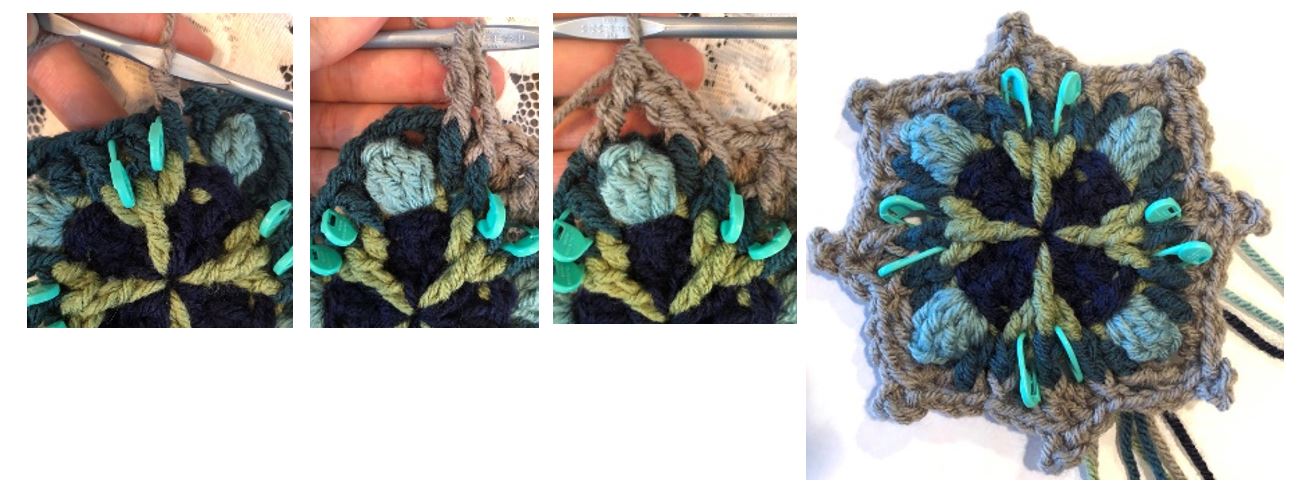
8 ch-3s, and 8 ch-3 picots.
In this round we will be skipping all the Round 6
stitches. We will be working behind
these stitches in the skipped stitches from Round 3 that we placed markers in,
and in our stitches from Round 5, some of which may already contain stitches
around the posts. It may be helpful to
push your Round 6 stitches forward to access these stitches – (see photos below
– l to r: exposing the Round 5 stitches at the corners – 3 on each side of the
corner space; exposing the 2 marked stitches from Round 3; push all your Round
6 stitches forward to make Rounds 3 and 5 easier to access.) Remove your markers as you work.
Join color F/6 with a standing dc in any skipped corner space from
Round 5. (Tr, ch 2, tr, dc) in the same
space. *
Continuing in your Round 5 stitches – dc in the next 3 stitches
– two of which will have stitches posted
around them already. Dropping to Round 3
and working in the skipped stitches you placed markers in – tr in the
first skipped stitch from Round 3, ch 1, tr in the next skipped stitch from
Round 3.
Returning to Round 5 – dc in the
3 stitches before the corner –
two of which will have stitches posted around them
already – your first stitch will be hidden. (Dc, tr, ch
2, tr, dc) in the next Round 5 corner space.* Repeat * to * 3 more times,
omitting corner sequence on final repeat.
Join with a slst to beginning dc and fasten off.
12 stitches and 1 ch-1 space per side.
You may want to take a moment to weave in your ends from
Round 6, or at minimum pull them to the back side of your work as this round
will become increasingly difficult to access after this round.
Special Stitch – Extended mini puff - xmp – insert
hook into indicated stitch or space, pull up a loop – 2 LOOPS ON HOOK. Yo, insert hook into same indicated stitch or
space, pull up a loop – 4 LOOPS ON HOOK.
Yo, pull through 3 loops, yo pull through last 2 loops.
Special Stitch – Extra Large Extended mini
puff – XLxmp – yo, insert hook into indicated stitch
or space, pull up a loop – 3 LOOPS ON HOOK.
Yo, insert hook into same indicated stitch or space, pull up a loop – 5
LOOPS ON HOOK. Yo, pull through 3 loops,
[yo, pull through 2 loops] twice.
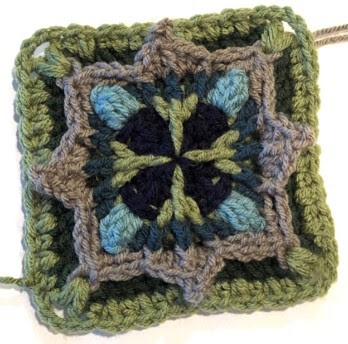
Join color G/2 with a standing hdc in the last stitch of any side. *Working in the
ch-2 corner space from Round 7 and the ch-3 picot from Round 6 directly below
it together – (XLxmp, ch 2, XLxmp) in the corner space and
picot *[Hdc in the next stitch, xmp in the next stitch] 3 times. Hdc in the ch-1 space. [Xmp in the next stitch, hdc in the next
stitch] 3 times. * Repeat * to * 3 more
times, omitting last hdc on final repeat.
Join with a slst to beginning hdc and fasten off. 15 stitches per side
Join color B/1 with a standing sc in any corner space. (Sc, ch 2, 2 sc)
in the same space. *Sc in the first 7 stitches, XLxmp in the next stitch and
ch-3 picot from Round 6 directly below it together. Sc in the last 7 stitches of the side, (2 sc,
ch 2, 2 sc) in the next corner space.*
Repeat * to * 3 more times, omitting last corner sequence on final
repeat. Join with a slst to beginning sc
and fasten off. 19 stitches per side.
Photo above shows Celtic Colorways, from l to r, A, B, and C
Photo above shows Land Versions, from l to r, A, B, and C
Please Remember:
This pattern was written and designed by me, Lisa Mauser, for This
Little Hook of Mine. I am happy to share it with you, but this pattern belongs
to me and I retain all rights. You may not distribute, sell, or share
this pattern, or any parts of it. If you wish to share the pattern,
please refer the party you are sharing it with to the original pattern link. Though this pattern has been tested, it is not perfect. If
you find a mistake, please let me know in the comments below or through the contact
me button and I will fix it.
Thank you for respecting my property. I really hope you
enjoyed the pattern!


I recently visited Tintagel Castle in cornwall, it has beautiful views although very steep to climb to the top of the ruins. I came across your patterns whilst on Google and eager to start The legends of king arthur squares.
ReplyDelete